Setting up a saltwater pool generator can feel like deciphering a secret code, but it's a remarkably satisfying upgrade for any pool owner. Imagine a world with less eye-stinging chlorine, fewer chemical runs to the store, and a gentler feel to your pool water. That's the promise of a saltwater system. If you're ready to dive into the Installation and Setup of Saltwater Pool Generators, this comprehensive guide will equip you with the knowledge and confidence to tackle the project, whether you're rolling up your sleeves for a DIY weekend or wisely deciding when to call in a pro.
By converting your traditional chlorine pool to a saltwater system, you're not just changing how you sanitize; you're streamlining maintenance, potentially reducing costs, and embracing an easier, more automated approach to pristine water. We'll walk through everything from the nuts and bolts of the equipment to the precise steps for installation and initial setup, ensuring your transition is smooth and your pool is sparkling.
At a Glance: Your Saltwater Generator Journey
- Understanding is Key: A salt chlorine generator uses a control unit and a salt cell to convert salt into chlorine through electrolysis.
- DIY or Pro? Basic plumbing and electrical skills are needed. Don't hesitate to hire a professional if you're uncomfortable with either.
- Safety First: Always turn off power to your pool equipment before any electrical work. Use proper safety gear.
- Three Main Phases: Installation typically involves mounting the control unit, plumbing in the salt cell, and finally, setting up your pool water chemistry.
- Essential Tools: Have screwdrivers, a level, wire cutters, a voltage meter, a hacksaw, rubber electrical gloves, and PVC glue handy.
- Salt Matters: Calculate and add the correct amount of salt (2,700-3,400 ppm) directly to the pool's shallow end, allowing 24 hours for dissolution.
- Post-Install Care: Regularly check water levels and clean the salt cell annually or as needed to prevent calcium buildup.
- Read Your Manual: Always prioritize the specific instructions provided by your generator's manufacturer.
Why Go Salty? The Appeal of Saltwater Pools
For many pool owners, the idea of a "saltwater pool" conjures images of the ocean, but the reality is quite different. Your saltwater pool will have a much lower salinity than the sea, just enough to be processed by a salt chlorine generator. This clever device liberates you from the hassle of manually adding chlorine. Instead of traditional chlorine tablets or liquid, you add regular pool salt to the water, and the generator takes over, producing the necessary chlorine on demand.
The benefits are compelling:
- Softer Water: Many find saltwater pools gentler on skin, hair, and eyes, reducing the irritation often associated with chlorinated water.
- Reduced Chemical Handling: Say goodbye to storing and handling harsh chlorine chemicals.
- Automated Sanitization: Once set up, the generator maintains consistent chlorine levels, often requiring less manual intervention.
- Lower Maintenance: While not maintenance-free, the day-to-day chemical balancing can be significantly simplified.
It's a step towards a more enjoyable, less labor-intensive pool experience. If you're interested in exploring different models and making an informed choice, our comprehensive pool salt generator guide offers a deep dive into available options and what to consider before you buy.
Understanding Your Salt Chlorine Generator: The Science Simplified
Before you start connecting wires and pipes, it's helpful to grasp the basic mechanics of how a saltwater generator works. It’s not magic; it’s elegant chemistry.
Core Components That Make it Happen
Your salt chlorine generator system primarily consists of two key players:
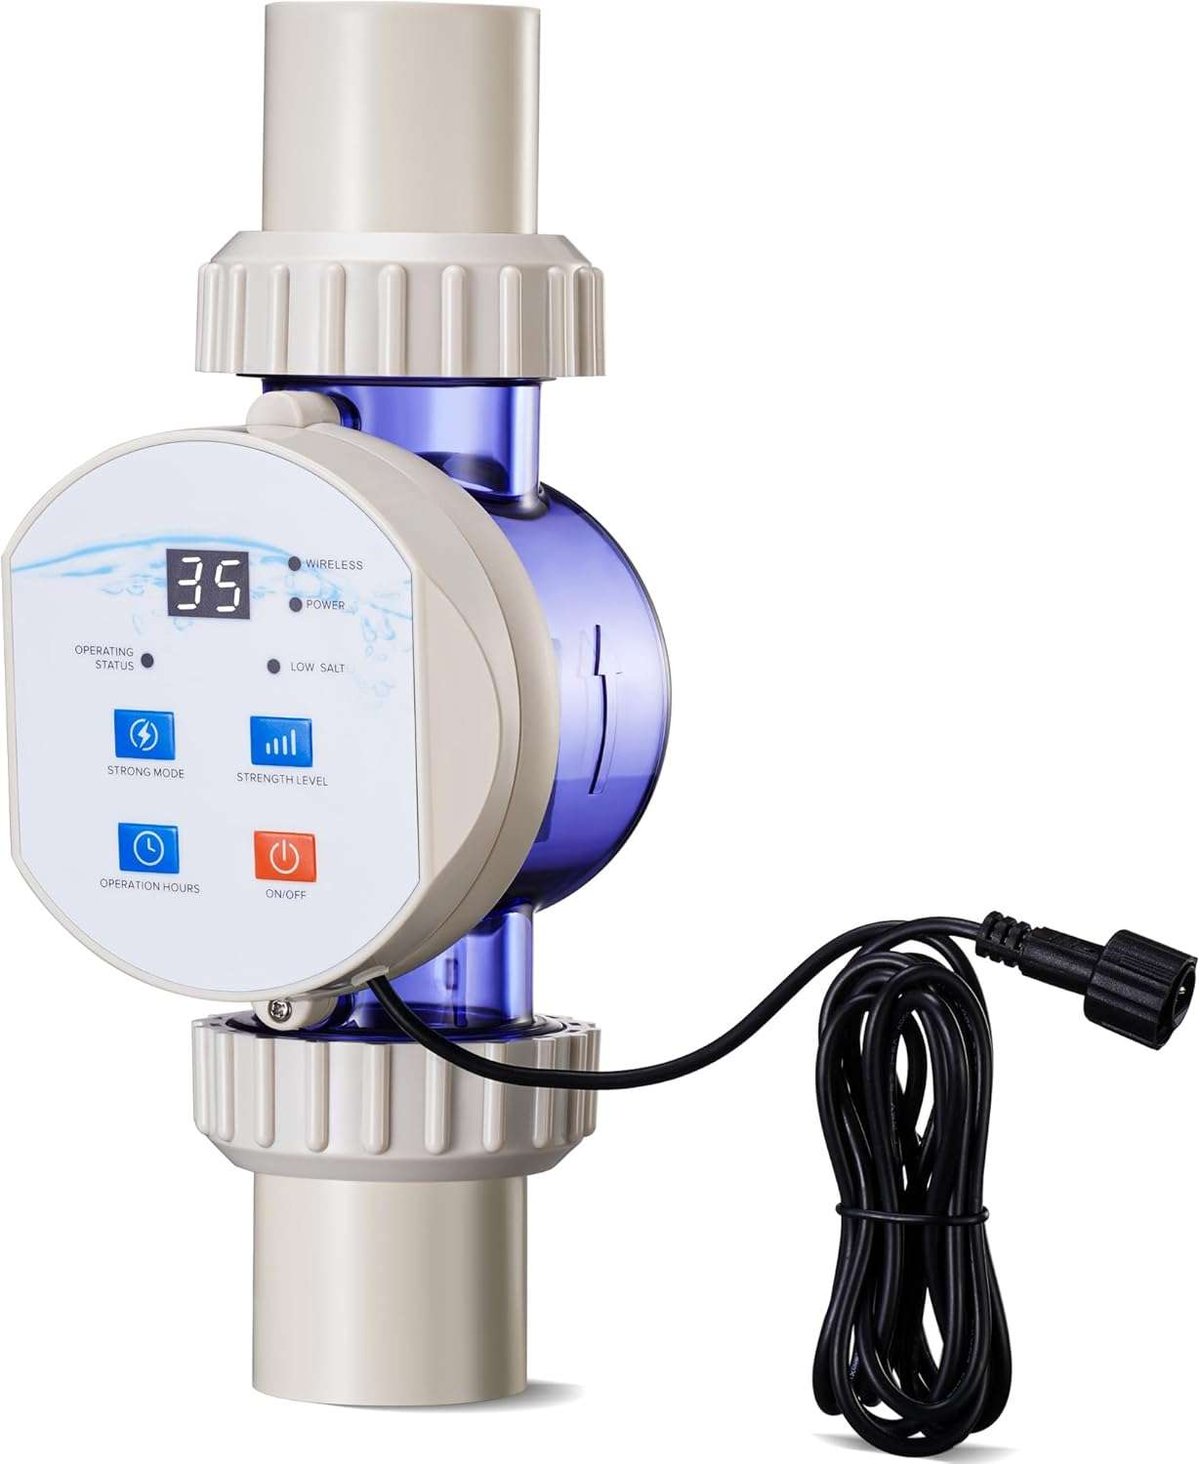
- The Control Unit: This is the brains of the operation. It's an electrical box that mounts near your pool's existing equipment pad. Its job is to provide power to the salt cell, control chlorine output levels, and often display critical information like salt levels, water temperature, and system status.
- The Salt Cell (Electrolytic Cell): This is where the magic happens. A cylindrical or rectangular component, the salt cell is plumbed directly into your pool's return line. Inside, it houses a series of parallel electrolytic plates (typically a steel cathode and a titanium anode).
How the Chlorine Gets Made
Here’s the quick rundown of the scientific process:
- Water Flow: Pool water, containing dissolved salt (sodium chloride, NaCl), flows through the salt cell.
- Electrical Current: The control unit sends a low-voltage electrical current across the electrolytic plates within the salt cell.
- Electrolysis: As the saltwater passes over the charged plates, an electrochemical reaction called electrolysis occurs. The chloride ions in the salt are converted into chlorine gas (Cl2). Simultaneously, hydrogen gas (H2) and sodium hydroxide (NaOH) are also produced.
- Sanitization: The newly formed chlorine gas quickly dissolves into the pool water, where it sanitizes and oxidizes contaminants, just like traditional chlorine. The hydrogen gas safely bubbles off into the atmosphere.
- Reversion: After the chlorine has done its job, it reverts back into chloride, ready to be converted into chlorine again by the salt cell. This continuous cycle means you rarely need to add more salt, only topping up what's lost through splash-out or backwashing.
Understanding these fundamentals will demystify the installation process and empower you to troubleshoot minor issues down the line.
Before You Begin: Essential Knowledge & Supplies
A successful installation starts with preparation. Gathering your tools and understanding the scope of work upfront will save you time and frustration.
Required Knowledge: When to DIY, When to Call a Pro
Installing a salt chlorine generator involves two primary skill sets:
- Basic Plumbing: You'll need to cut into your existing PVC pool return line and glue new fittings, unions, and the salt cell itself into place. This requires a steady hand, precise measurements, and a good understanding of PVC fitting and sealing.
- Basic Electrical: The control unit needs to be wired into your pool's power system, typically through the pool timer or a dedicated circuit. This involves working with live electrical current, checking voltage, and making secure connections.
Be Honest with Yourself: If you are not completely comfortable with either basic plumbing or, especially, electrical work, do not proceed. Hiring a qualified professional—a licensed electrician, plumber, or pool technician—is a wise investment. Incorrect electrical wiring can be dangerous, leading to equipment damage, electrical shock, or fire. Moreover, some manufacturers' warranties might be voided if non-professional installation is detected. Always check your warranty conditions.
Safety First: Non-Negotiables
Working with electricity and power tools demands utmost respect.
- ALWAYS Turn Off Power: Before touching any electrical components, wiring, or even plumbing near electrical equipment, ensure the main power to your pool equipment (and preferably your entire house at the breaker panel) is OFF. Verify with a voltage meter.
- Wear Safety Gear: Rubber electrical gloves are essential when handling wiring. Safety glasses protect against debris when cutting pipe.
- Work in a Dry Area: Avoid working on electrical components in wet conditions.
- Follow Local Codes: Be aware of and comply with all local electrical and plumbing codes in your area.
Your Essential Toolbox Checklist
Having the right tools at hand makes all the difference:
- Screwdriver Set: For mounting brackets and electrical connections.
- Level: To ensure the control unit is mounted straight.
- Wire Cutters/Strippers: For preparing electrical wires.
- Voltage Meter (Multimeter): CRITICAL for checking power before and during electrical work.
- Hacksaw or PVC Pipe Cutter: For clean cuts on PVC pipe.
- Rubber Electrical Gloves: For electrical safety.
- PVC Primer and Glue: Essential for creating strong, leak-proof PVC connections.
- Tape Measure: For accurate pipe cutting and placement.
- Utility Knife/Deburring Tool: To smooth cut PVC edges.
- Marker: To mark cut lines on pipes.
- Clean Rags: For wiping excess glue.
- The Salt Cell and Control Unit: Of course!
- PVC Couplings/Elbows: As needed, usually supplied with the salt cell or purchased separately based on your plumbing layout.
Getting Your Pool Water Ready (Pre-Installation)
While you'll add salt after installation, it's a good idea to ensure your pool's water chemistry is balanced before starting the project. This means checking and adjusting pH, alkalinity, and calcium hardness. A balanced pool makes for a smoother startup once the generator is running.
The Installation Journey: Step-by-Step Guide
This process is generally broken down into three logical stages. Take your time, double-check your work, and refer to your specific manufacturer's manual frequently.
Part 1: Setting Up the Control Unit (The Brains of the Operation)
The control unit needs a safe, dry, and easily accessible home near your existing pool equipment.
- Choose an Accessible Mounting Area:
- Look for a vertical surface (wall, post) near your pool pump, filter, and heater.
- Ensure it's within reach of existing electrical connections (pool timer) and where the salt cell's cable can comfortably plug in.
- Consider sun exposure – direct, prolonged sunlight can potentially shorten the lifespan of electronic components. Shade is often preferable.
- Avoid mounting directly above heat sources or where it will be constantly splashed.
- Mount the Control Unit Bracket:
- Using the manufacturer-provided template or the unit itself, mark the drilling points for the mounting bracket.
- Use your level to ensure the bracket will be perfectly horizontal or vertical, depending on its design.
- Drill pilot holes and secure the bracket firmly to the chosen surface using appropriate screws (often lag bolts for masonry or wood).
- Secure the Control Unit:
- Once the bracket is solid, attach the control unit itself. This usually involves sliding it onto the bracket or screwing it directly into place. Follow your manufacturer's specific instructions here.
- Connect the Pool Timer and the Control Unit with a Power Cord:
- CRITICAL SAFETY STEP: Turn off all power to your pool timer box, pump, and any associated circuits at your main electrical breaker panel. VERIFY with your voltage meter that power is off.
- Your control unit typically needs to be wired to your pool timer so that the generator only runs when the pool pump is running.
- Open your pool timer box.
- Check Output Power Level (120 or 240 VAC): With the timer box open, temporarily turn the main power back ON (briefly and carefully!). Place the probes of your electrical meter onto the output terminals where your pool pump is wired. Note whether the output is 120 or 240 VAC. This is crucial for correctly configuring your control unit.
- CRITICAL SAFETY STEP: Turn power OFF again at the breaker panel and VERIFY with your voltage meter before proceeding. Replace the pool timer cover once power is off.
- Configure the Control Unit:
- Your control unit will have terminals for wiring. Based on the 120 or 240 VAC output you identified, wire the control unit into the appropriate terminals on your pool timer.
- Always follow the wiring diagram provided in your generator's manual precisely. If in doubt, consult a licensed electrician.
- Ensure all connections are tight and secure.
- Carefully close and secure the pool timer cover.
Part 2: Integrating the Salt Cell (The Heart of Chlorine Production)
The salt cell must be plumbed into your pool's return line after the filter and heater (if you have one). This ensures already filtered and heated water passes through the cell.
- Check and Tighten the Salt Cell Barrel Unions:
- The salt cell will come with barrel unions on either end. Before plumbing, ensure these unions are hand-tightened snugly. This prevents leaks when the system is under pressure. Some prefer to use a specialized wrench for an extra turn, but be careful not to overtighten and crack the plastic.
- Cut 7-10 Inches of PVC Pipe:
- Identify a straight section of your existing PVC return piping where the salt cell can be installed. This section should be after your filter and heater.
- Using a hacksaw or PVC pipe cutter, cut out a section of your existing PVC pipe to accommodate the length of your salt cell assembly (including unions and any necessary adaptors). The exact length will depend on your specific cell and plumbing layout. Aim for a clean, straight cut.
- Preparation: Lightly sand or deburr the freshly cut edges of the PVC pipe, both the existing pipe and any new pieces. This protects you from sharp edges and helps ensure a better seal with the glue.
- Dry Fit: Always dry-fit all components (salt cell, unions, new pipe sections, elbow joints) before applying primer and glue to ensure everything aligns correctly.
- Attach New PVC Sections to the Salt Cell:
- Glue short (7-10 inch) pieces of PVC pipe to the input and output ends of the salt cell's barrel unions. Apply PVC primer generously to both the inside of the union and the outside of the pipe, then apply PVC glue, twisting the pipe into the union for a secure, watertight bond. Hold firmly for 30 seconds.
- Glue the Elbow Joints (if needed) and Connect to Return Piping:
- If your plumbing requires turns, attach 90-degree elbow joints to the cut ends of the PVC pipes you just glued to the salt cell, facing outwards towards your existing return line.
- Prime and glue these elbows (or straight couplings) to the cut ends of your existing return piping. Ensure both ends are well-sealed. You're effectively creating a bypass loop or an inline section for the salt cell. The goal is a completely sealed, leak-free system.
- Allow Glued PVC Pipes to Dry for a Few Hours:
- Patience is Key: Do not turn on the system immediately. PVC glue needs time to cure properly to achieve maximum strength and prevent leaks. Follow the manufacturer's recommendations on the glue, but a few hours (or even overnight) is a good rule of thumb before subjecting the pipes to water pressure.
- Plug the Salt Cell into the Control Unit:
- Once the plumbing is fully dry, plug the salt cell's cable securely into the corresponding receptacle on the control unit.
- Prime the Pool Pump:
- Before turning on your entire system, ensure your pool pump is primed. This means ensuring it's full of water and not running dry. Running a pump dry can cause severe damage.
Part 3: Bringing Your Saltwater Pool to Life (Adding Salt & Initial Startup)
With the hardware installed, it's time to introduce the star ingredient: salt!
- Calculate the Amount of Salt Needed for Your Pool:
- Your goal is typically 2,700-3,400 parts per million (ppm), with many manufacturers recommending an optimal 3,200 ppm.
- To calculate, you need your pool's volume (gallons) and its current salt level (if any). Use a test strip or digital tester to find the current salt level.
- Formula Example (check your generator's manual for specifics):
- (Desired PPM - Current PPM) / 2500 x Pool Volume (gallons) = Pounds of Salt Needed.
- (Note: 2500 is a common conversion factor, but can vary slightly depending on salt purity and generator recommendations.)
- Pour Bags of Salt into the Shallow End of the Pool:
- Use high-purity, granular, non-iodized pool salt.
- Do NOT pour salt directly into the skimmer! This can create a highly concentrated salt solution that could damage pool equipment before it has a chance to dissolve.
- Instead, cut open bags and pour the salt directly into the shallow end of the pool.
- Use a pool brush to gently agitate the salt and help it dissolve.
- Allow the Pool to Circulate for 24 Hours:
- Turn on your pool pump (and only the pump, not the generator yet).
- Let the water circulate continuously for at least 24 hours to ensure the salt fully dissolves and disperses evenly throughout the entire pool.
- Avoid swimming during this time. The water won't be fully sanitized, and you could stir up undissolved salt.
- Turn on the Salt Chlorine Generator and Verify Salt Level:
- After 24 hours of circulation, turn on the salt chlorine generator.
- Most control units will display the current salt level. Verify that it's within the optimal range (e.g., around 3,200 ppm). If it's too low, add more salt; if too high, you might need to partially drain and refill with fresh water.
- Set your desired chlorine output level on the control unit (e.g., 50% or 75%) according to your pool's size and bather load.
- Enjoy the Pool!
- Once everything is running smoothly and your salt levels are optimal, you're ready to enjoy the clear, gentle water of your new saltwater pool. Remember that salt levels are generally very stable and don't dissipate like chlorine. You'll likely only need small top-ups annually to account for splash-out or backwashing.
Simplified Installation: A Glimpse at DIY-Friendly Systems
While the general steps above cover most installations, some modern salt chlorine generators are designed with ease of DIY in mind, streamlining the process significantly. Products like the CircuPool CORE series exemplify this approach, potentially cutting down installation time to just 10-15 minutes for handy homeowners.
Here's how a simplified installation might look:
- Marking Your Spot: Using a template (often provided), identify an ideal 11.25-inch straight section of pipe in your existing plumbing, ideally after the pump, filter, and heater. Mark the cut points.
- Making the Cut: With a fine-toothed saw or a specialized PVC pipe cutter, precisely cut the pipe at your marks. Smooth any rough edges (de-burr) to ensure a clean fit.
- Installing Plumbing Components: Slip the threaded collars that come with the system over the newly cut pipe ends. Then, apply PVC primer and cement (glue) to the pipe ends and the unions provided with the system. Quickly and firmly push the unions onto the pipe ends, holding for about 30 seconds for a strong bond.
- Installing the Salt Pool System: The control module and salt cell are often integrated or designed to connect directly and seamlessly. Position this assembly between the two unions you just cemented to your pipe. Hand-tighten the threaded collars to secure the system firmly in place.
- Connecting to Power: For these DIY-friendly systems, a common option is simply plugging the unit into an existing GFCI (Ground Fault Circuit Interrupter) outlet. This avoids the more complex hard-wiring to a pool timer, which saves significant electrical work. (However, hard-wiring options are usually still available for those who prefer them.)
- Powering On and Adjusting: Once your pool salt has been added and allowed to dissolve (as per Part 3 above), you can power on the generator. Use the control panel to set your desired chlorine output level, and the system will begin sanitizing.
These streamlined options are excellent for reducing installation costs and making the conversion project accessible to more homeowners. However, always ensure you're comfortable with the plumbing aspects, even if the electrical is simplified.
Beyond Installation: Post-Setup & Ongoing Care
Congratulations, your saltwater pool generator is up and running! But the journey doesn't end there. A little ongoing attention will ensure your system operates efficiently for years to come.
Initial Adjustments & Monitoring
- Fine-Tuning Output: For the first week or two, closely monitor your pool's free chlorine levels using a reliable test kit. Adjust the output percentage on your control unit as needed to maintain a consistent free chlorine residual (typically 1-3 ppm). Factors like bather load, sunlight intensity, and water temperature will influence how much chlorine your pool needs.
- Salt Level Check: While salt levels are stable, occasionally verify them with your control unit's display or a test kit. Only add salt if the levels drop below your generator's recommended minimum.
- Stabilizer (Cyanuric Acid) Levels: Ensure your pool has adequate cyanuric acid (CYA) levels (typically 30-80 ppm). CYA acts as a "sunscreen" for chlorine, preventing it from dissipating too quickly in sunlight. Without it, your generator will have to work much harder.
Routine Maintenance for Longevity
- Water Balance: Regular testing and adjustment of your pH, alkalinity, and calcium hardness are still vital. Balanced water protects your equipment and ensures the generator operates effectively.
- Salt Cell Cleaning: The electrolytic plates inside the salt cell can accumulate calcium scale (white, crusty deposits), especially in areas with hard water. Most generators have an indicator or a self-cleaning cycle to help. When calcium builds up, the cell's efficiency decreases.
- How to Clean: Turn off power. Remove the salt cell. If deposits are visible, you can often clean them by soaking the cell in a diluted acid solution (e.g., 4:1 water to muriatic acid, or a commercial cell cleaning solution) for 10-15 minutes, then rinsing thoroughly. Always add acid to water, never water to acid, and wear protective gear. Some cells have a polarity reversal feature that self-cleans, but manual cleaning may still be needed annually or semi-annually.
- Winterization: If you close your pool for winter, follow your manufacturer's specific instructions for removing and storing the salt cell.
Navigating the Nuances: FAQs & Expert Tips
Even with a detailed guide, questions pop up. Here are some common concerns and valuable insights to keep in mind.
When Should I Absolutely Call a Professional?
- Complex Electrical Work: If your pool timer box is old, lacks space, or you're unsure about wiring to a sub-panel or circuit breaker, get a licensed electrician. Electrical mistakes can be life-threatening.
- Non-Standard Plumbing: If your existing plumbing layout makes it difficult to install the salt cell in a straight section or requires significant re-piping that you're uncomfortable with.
- Warranty Concerns: Some higher-end or commercial systems may have warranties that require professional installation to remain valid. Always check!
- Time Constraints/Lack of Confidence: If you simply don't have the time, patience, or confidence to perform the installation yourself, a professional will ensure it's done correctly and safely. Qualified handymen with plumbing and electrical experience can often perform installations as well.
Common Pitfalls to Avoid
- Incorrect Salt Levels: Too low, and the generator won't produce enough chlorine. Too high, and it can damage the cell and other equipment, or cause a "salty" taste.
- Skipping the 24-Hour Dissolve: Turning on the generator too soon can damage the cell with highly concentrated salt.
- Plumbing Before the Filter: The salt cell must be after your filter (and heater) to prevent debris from damaging the plates and ensure proper operation.
- Ignoring Water Chemistry: A saltwater generator doesn't eliminate the need for regular pH, alkalinity, and CYA testing. These are still crucial for balanced water and efficient chlorine production.
- Not Cleaning the Cell: Calcium buildup significantly reduces cell efficiency and lifespan.
How Often Will I Need to Add Salt?
Typically, only small top-ups are needed annually. Salt doesn't evaporate or get "used up" like chlorine. You primarily lose salt through:
- Splash-out: Swimmers, wind, rain.
- Backwashing: During filter cleaning.
- Draining/Refilling: When lowering the water level or performing maintenance.
Test your salt levels regularly (once a month or seasonally) and add salt only when indicated by your generator or test kit.
The Importance of Water Balance (pH, Alkalinity, Stabilizer)
These parameters are still critical in a saltwater pool.
- pH: The chlorine produced by the generator tends to raise pH. You'll need to monitor and adjust pH more frequently (typically with muriatic acid) to keep it in the ideal 7.4-7.6 range.
- Alkalinity: Total alkalinity helps buffer pH changes. Keep it between 80-120 ppm.
- Calcium Hardness: Prevents corrosion or scaling. Maintain 200-400 ppm.
- Cyanuric Acid (CYA): Crucial for protecting your chlorine from UV degradation. Maintain 30-80 ppm.
Your Next Splash: Taking the Plunge with Confidence
The journey of converting to a saltwater pool generator, from deciphering wiring diagrams to calculating salt, is a rewarding one. You've now got the fundamental knowledge to approach the installation and setup of saltwater pool generators with a clear plan.
Whether you choose the DIY path with proper safety measures and adherence to manufacturer guidelines, or wisely decide to entrust complex electrical or plumbing tasks to a qualified professional, the outcome will be the same: a beautiful, self-sanitizing pool that's easier to maintain and more enjoyable for everyone. So, gather your tools, review your manual one more time, and get ready to enjoy the sparkling, soft water of your new saltwater oasis. Happy swimming!